Sean Korb's 375 Windsor Stroker
This page: www.bacomatic.org/~dw/dehaven/dehaven.htm
Main page: http://www.bacomatic.org/~dw/index.htm
Last Updated: 6 Sep 2003
Author: Dave Williams; dlwilliams=aristotle=net
This 375 Windsor was originally built for David DeHaven's early Mustang. For
various reasons it took a long time to finish this one. I had to make a bunch
of tools, some parts had been discontinued, some parts had been updated and no
longer fit, and some were just plain bad. Plus a lot of plain old weird
stuff kept happening.
The engine finally got finished in February '01. Dave and I met in a cold,
windy Denny's parking lot in Missouri and wrestled the completed engine, two
Honda motorcycle engines, and assorted "stuff" from my truck to his.
In February 2003 David got Pantera lust, sold his Mustang project, and
sold the 379 to Sean Korb, who is going to put it in his '68 Cougar.
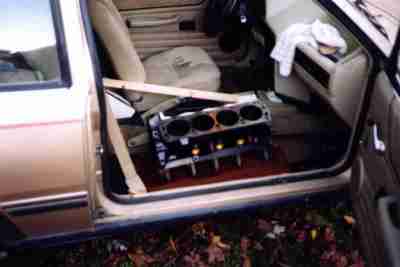
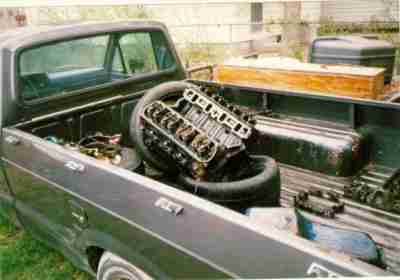 Here's the core and assorted bits as they came from the core yard.
The "coffin" in the background is an old waterbed frame; part of it became my
engine run stand later. The "garbage can" is the safety shield from my Coats
spin balancer. Like most ill-designed "safety" equipment it was more hassle
than it was worth. Coats thought they made it nonremoveable by welding the
hinges to the main machine frame. That took only a few minutes with the air
cutoff tool...
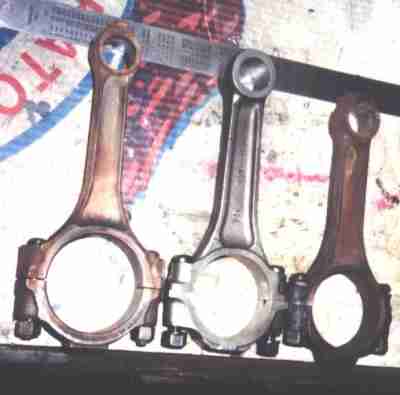 Left to right:
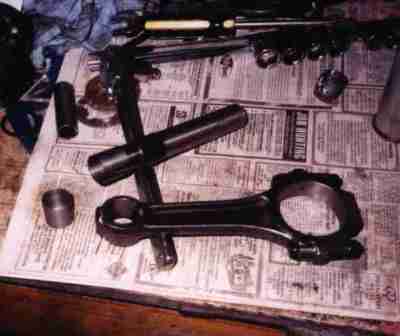
351 Windsor rod, 5.95" long, takes 2.311" bearing, .912" pin
360 Chrysler rod, 6.125" long, takes 2.130" bearing, .965" pin
350 Chevy rod, 5.7" long, takes 2.100" bearing, .927" pin
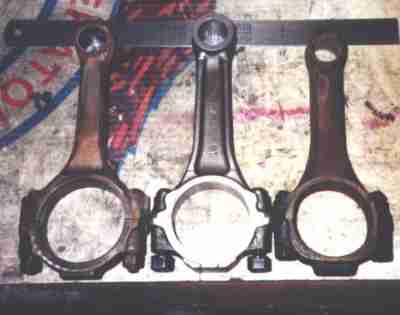 A better view of the relative rod lengths. The Chrysler rod has more meat on
the big end and a beefier cap than the other two.
A better view of the relative rod lengths. The Chrysler rod has more meat on
the big end and a beefier cap than the other two.
 Narrowing the big ends on the milling machine. The Chrysler rods are
considerably wider than the Ford crank journals.
Narrowing the big ends on the milling machine. The Chrysler rods are
considerably wider than the Ford crank journals.
 I had done several engines with Chevy pistons and Chrysler rods before. The
Federal-Mogul master catalog had a listing for a bronze pin bushing that fit
almost perfectly - hone the pin end out a bit, drive the bushing in, then hone
the bushing to fit.
I had done several engines with Chevy pistons and Chrysler rods before. The
Federal-Mogul master catalog had a listing for a bronze pin bushing that fit
almost perfectly - hone the pin end out a bit, drive the bushing in, then hone
the bushing to fit.
Federal-Mogul stopped making the bushing, and I couldn't find anything else
close. Since these rods didn't have to be set up for floating pins, I decided
to use 1018 steel tubing instead. I made a lathe fixture to hold the thinwall
tubing round while turning then OD, another to hold it for turning the ID, and
drove the bushings into the rods with a hefty .005" interference fit. I
thought nothing short of dynamite would remove them. I took them to the rod
machine and honed the pin ends to .925" for .002 interference on Chevy pins.
I heated the first rod on the heating fixture, swung it over to the piston,
already waiting in its locating fixture, and... the interference fit bushing
fell out on the floor and rolled under the bench. WTF? The outside expanded
as expected with the heat; for some reason, the bushing didn't. When I told
some other shop guys about it they got big laughs, "yeah, that always
happens." I took the MIG and tack welded the bushings in place, ran them back
over the honing mandrel to make sure they were still round, and then started
assembling the rods and pistons.
 The Chrysler rods are good parts, but somewhere along the line I got the idea
one of them was bent. I scouted every other shop within 75 miles and couldn't
find one with a rod checker, so I designed and built my own, accurate to
within .00025". Two fixtures were required. This first one makes sure the
hole is perpendicular to the sides of the big end.
The Chrysler rods are good parts, but somewhere along the line I got the idea
one of them was bent. I scouted every other shop within 75 miles and couldn't
find one with a rod checker, so I designed and built my own, accurate to
within .00025". Two fixtures were required. This first one makes sure the
hole is perpendicular to the sides of the big end.
Since I already had some of the pistons hung I made it so I could check rods
with the pistons on them.
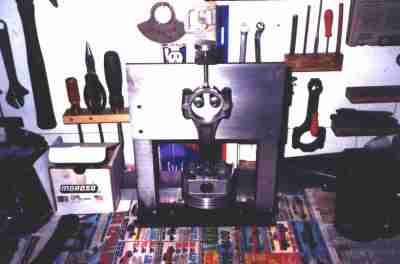
 Piston vise, flycutter, and piston. Federal-Mogul now ships Speed-Pro pistons
in TRW boxes. There's nothing wrong with Speed-Pro pistons... except the TRW
valve reliefs in 350 Chevy pistons will clear Ford valves and Speed-Pro
pistons won't.
Piston vise, flycutter, and piston. Federal-Mogul now ships Speed-Pro pistons
in TRW boxes. There's nothing wrong with Speed-Pro pistons... except the TRW
valve reliefs in 350 Chevy pistons will clear Ford valves and Speed-Pro
pistons won't.
I found this out during the trial fit. The crank, cam, one rod, and a piston
were installed, with one of my special undersize wristpins. The exhaust
valves overlapped the reliefs by .050" or so.
I needed a piston holding fixture anyway, so I made one and flycut the exhaust
valve reliefs for proper clearance.
During the build, the price of forged Chrysler pistons went from $180 to
almost $400, and the $125 Chevy pistons went to $250. I bushed the Chrysler
rods to take Chevy pistons and used them to save money.
 We're on final assembly here. Well, it was supposed to be. With the main
caps torqued down the crank turned with great difficulty. The crank was
standard size on the mains; I had just ass-umed it was straight. It was bent
almost .005" TIR on the #2 main. Everything had to come back apart, the crank
had to be straightened and ground .010" undersize on the mains, and new
bearings purchased.
We're on final assembly here. Well, it was supposed to be. With the main
caps torqued down the crank turned with great difficulty. The crank was
standard size on the mains; I had just ass-umed it was straight. It was bent
almost .005" TIR on the #2 main. Everything had to come back apart, the crank
had to be straightened and ground .010" undersize on the mains, and new
bearings purchased.
 I put the newly turned crank in the block on its new bearings, snugged the
main caps down, and... it wouldn't turn! WTF? The Plastigage and micrometer
relayed the awful truth. This block, the third block, the one that was
Magnafluxed, torque plate honed, and detailed to the nines... this block had
the wrong main caps! Not only did they not make a round bore, they didn't fit
tightly in their cutouts. Damn!
I put the newly turned crank in the block on its new bearings, snugged the
main caps down, and... it wouldn't turn! WTF? The Plastigage and micrometer
relayed the awful truth. This block, the third block, the one that was
Magnafluxed, torque plate honed, and detailed to the nines... this block had
the wrong main caps! Not only did they not make a round bore, they didn't fit
tightly in their cutouts. Damn!
I dug through my extensive cap collection and wound up having to pick a couple
of those, plus sacrifice a good Windsor block to get five caps that were
close. But they weren't quite close enough. I had to haul it off to Little
Rock and pay $125 to have it align bored.
AB was driving my truck, so I pulled the passenger seat out of the Escort and
rolled the block into the floor from the hand truck. It's actually easier to
haul a block around in the Escort than it is to back the truck into the shop
where the chain hoist is.
 Okay, the crank is back in, bearing clearances are fine, everything is round
or straight as it's supposed to be, and the block has been washed and dried
for the dozenth time. All the bottom end is together and torqued. I'm
getting ready to bolt the heads on. I already checked valve to piston
clearance and wrote the figures down, but the Voices told me to check it
again. More bad news - the exhaust valve doesn't even touch the clay, but I
whacked an intake valve into the piston hard. WTF?
Okay, the crank is back in, bearing clearances are fine, everything is round
or straight as it's supposed to be, and the block has been washed and dried
for the dozenth time. All the bottom end is together and torqued. I'm
getting ready to bolt the heads on. I already checked valve to piston
clearance and wrote the figures down, but the Voices told me to check it
again. More bad news - the exhaust valve doesn't even touch the clay, but I
whacked an intake valve into the piston hard. WTF?
Back when I was trial fitting the engine pieces I had degreed the cam. It
wound up 20 degrees advanced. I checked it half a dozen times, then checked a
known-good cam just in case I was making some stupid mistake over and over.
Nope, it's 20 degrees off. I finally called Iskenderian, who told me to just
send it back. They replaced it without comment. I should have realized that
being off that far would do dramatic things to the valve to piston clearances,
but noooo... after degreeing the new cam it was apparent the pistons would
need to be cut again.
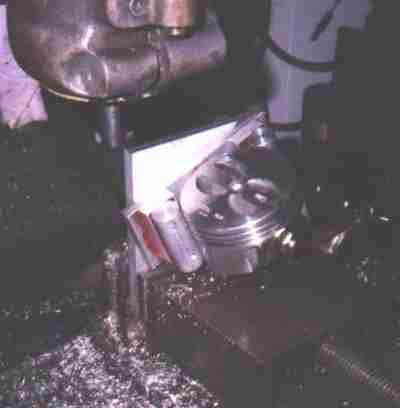
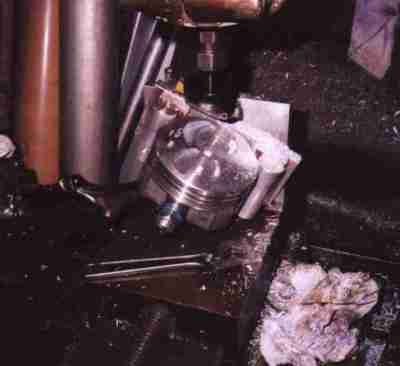
 You can't really see it well in this shot, but #3 piston is covered with felt
tip markings showing where the new valve relief needs to be cut.
You can't really see it well in this shot, but #3 piston is covered with felt
tip markings showing where the new valve relief needs to be cut.
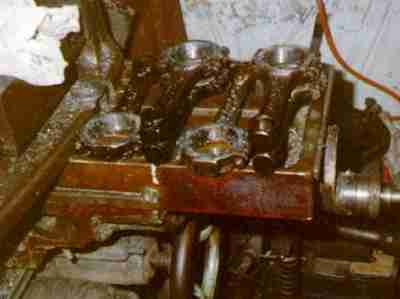
The lifter valley is painted with Nybco white epoxy paint. I can't find any
local place that still sells it. The VHT white turns sort of yellowy when it
gets oil on it, while the Nybco stuff always stayed bright white.
There's no real reason the lifter valley has to be painted; I just
think it looks nice.
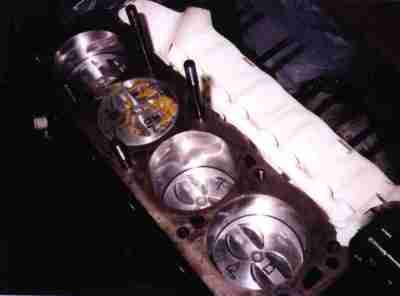
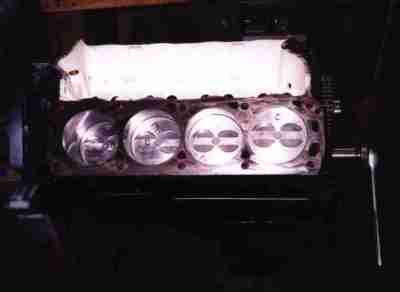
 Here we are on the mill fixture again. I pulled the pistons one at a time,
cut them, cleaned them, reassembled the ring packs and bearings, and
reinstalled them before going to the next piston. It took a lot of
cutting to clear the intake valves. These pistons also have offset piston
pins, so the left and right banks had slightly different setups since the
fixture locates the pistons by the pins.
Here we are on the mill fixture again. I pulled the pistons one at a time,
cut them, cleaned them, reassembled the ring packs and bearings, and
reinstalled them before going to the next piston. It took a lot of
cutting to clear the intake valves. These pistons also have offset piston
pins, so the left and right banks had slightly different setups since the
fixture locates the pistons by the pins.
 Okay, valve/piston clearance is okay, everything is double-checked now,
wrapping up the bottom end. This engine uses an MPG Head Service windage
tray, which is also sold by Ford Motorsport. It's a pretty nice piece. The
lump of clay on the oil pickup is for checking the pickup-to-pan clearance.
I had to bend it slightly to clear the Milodon oil pan.
Okay, valve/piston clearance is okay, everything is double-checked now,
wrapping up the bottom end. This engine uses an MPG Head Service windage
tray, which is also sold by Ford Motorsport. It's a pretty nice piece. The
lump of clay on the oil pickup is for checking the pickup-to-pan clearance.
I had to bend it slightly to clear the Milodon oil pan.
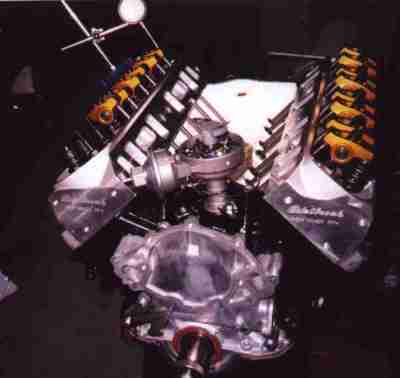
 NOW it's time to put the heads on for the last time. The Motorsport oil
pump driveshaft didn't have a retaining clip and could fall down into the oil
pan when you pulled the distributor. I made an aluminum collar for it on the
lathe and pressed it on. The distributor was in there to line it up so I
could rotate the engine and make sure the crank didn't hit it.
NOW it's time to put the heads on for the last time. The Motorsport oil
pump driveshaft didn't have a retaining clip and could fall down into the oil
pan when you pulled the distributor. I made an aluminum collar for it on the
lathe and pressed it on. The distributor was in there to line it up so I
could rotate the engine and make sure the crank didn't hit it.
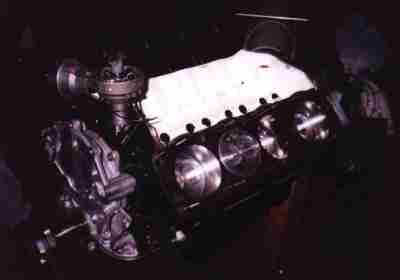
Fortunately I hadn't bent any valves checking the clearances. All cylinders
passed the vacuum tester check.
The mirror finish on the cylinder walls takes a while to generate with the
hone. That's what Speed-Pro calls out in their instructions, though. Cross
hatching the cylinders went away with chrome rings; moly rings want a smooth
surface.
 The engine used standard-length Motorsport hardened pushrods, believe it or
not! It's rather rare for a Ford to have the pushrod length anywhere close
when you're running roller rockers, since most rollers are really Chevy parts,
and the cup height is different.
The engine used standard-length Motorsport hardened pushrods, believe it or
not! It's rather rare for a Ford to have the pushrod length anywhere close
when you're running roller rockers, since most rollers are really Chevy parts,
and the cup height is different.
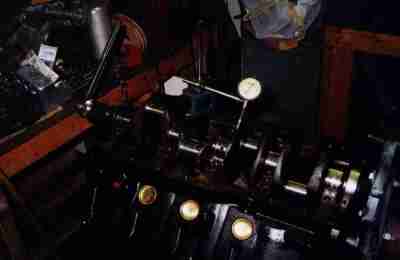
I'm setting the valve lash with a dial indicator. Some people like to play
spin-the-pushrod and count turns on the lock nut, but the dial indicator is
more accurate when you're using poly-locks, which tend to change their height
when the lock nut takes up the slack in the threads.
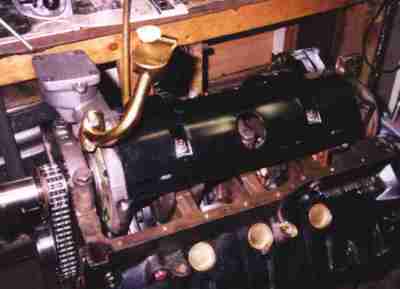
 Dave sent a brand new timing cover for the engine. I installed it and the
rebuilt Damper Dudes damper. My TDC piston stop tool wouldn't work with the
Edelbrock heads, so I had to make a new one. Good thing I did; see the step
in the tape? That's how far the timing marks were off. Not too unusual for a
small Ford since Ford has used a bunch of different locations for the marks
and pointers. I used my Dremel to mark true TDC and 8 before.
Dave sent a brand new timing cover for the engine. I installed it and the
rebuilt Damper Dudes damper. My TDC piston stop tool wouldn't work with the
Edelbrock heads, so I had to make a new one. Good thing I did; see the step
in the tape? That's how far the timing marks were off. Not too unusual for a
small Ford since Ford has used a bunch of different locations for the marks
and pointers. I used my Dremel to mark true TDC and 8 before.
The Far-East timing cover fit okay... but the four oil pan bolt holes on the
bottom were metric! I had actually dug out four compatible-pitch metric bolts
from my bench stock when I realized it would be a really nasty thing to do to
someone; the holes were close enough to cross-thread a 1/4-20 oil pan bolt in
to, either breaking off the bolt or stripping the hole. Just the ticket when
you're laying on the ground trying to put the oil pan back on. I retapped the
holes to 1/4-20. Now it doesn't have four weird pan bolts. Details,
details...
============================================================================
MAXIMUM OVERDRIVE RACING ENGINES
379 Ford stroker
completed 01/20/01
warranty: If it breaks, you get to keep all the pieces you can find.
*****
351 Ford stroked to 3.66", .030 overbore (379 CID)
Isky 280 Mega cam, 232/232 @ .050, .517/.517 lift, 108 lobe center
Edelbrock Performer RPM aluminum heads
Compression:
776 cc swept volume (bore/stroke 4.060/3.66)
60 cc nominal chamber volume
- 2 cc +.010" deck
7.3 cc .035 gasket
5 cc valve notches (estimated)
--------
7-.3 cc total clearance volume
776/70.3 = 11.0:1 CR
*****
===========================================================================
* 3 oil filters, application: 1978 Nissan 510, 2.0L 4 cyl (L20B)
Purolator Filter number L30119
Fram PH2850
Motorcraft FL-181
Wix 51452
These are full size, have no bypass spring, but do have the rubber
flapper for anti-drainback for faster oil pressure buildup on cold start.
This is technically a metric filter, but they will screw on just fine.
You might want to keep everything clean so you can take one back if they
have made a production change that keeps them from working.
*Check* for the rubber flapper and no spring, just in case the filter
maker has made a change. You can do without the flapper, but you don't
want the spring.
If you need a half height filter use the Purolator L22167 or equivalent.
* 15 quarts of non-synthetic oil, 10w30 or 10w40
* torque wrench good to 100 ft-lb minimum
* antiseize (high temp preferred)
* gasket sealer (Ultra Copper or Ultra Blue) (make sure whatever you use is
oil resistant - some silicone sealers are not! - read the label!)
* new crankshaft pilot bearing
* harmonic balancer bolt
* 1 bottle of one of the following oil additives:
Crane, Crower, Isky, Sig Erson, or other cam lube
GM Engine Oil Supplement
Chrysler High-Performance Supplement
Ford Oil Conditioner C2AZ-19579-A
* new spark plugs
COMPONENTS ---------------------------------------------------------------
crankshaft:
351W, 7M casting
stroked to 3.66"
mains 351W -.030" undersize
main bearing clearance .0015"
rods 2.123" small block Mopar (.001-.002" undersize)
polished journals
balanced (drill only)
Seal Saver on rear seal surface
pistons:
TRW L2256F-60 forged 1.55 pin height (for 350 Chevy)
flat top with four valve reliefs
4.060 diameter
pistons are actually Speed Pro with TRW part numbers
wristpin offsets .050" to quiet side
pistons flycut for Edelbrock heads and Isky cam
minimum .100" valve/piston clearance
rings:
standard small block Chevy. 4.060, Hastings, moly top
side clearance .003 top and second
ring gaps #1 .023 #5 .023 top
.023 .026 2nd
#2 .020 #6 .023
.022 .026
#3 .020 #7 .023
.021 .025
#4 .023 #8 .023
.024 .026
all oils ~.036
rods:
small block Mopar, 6.123" long
forgings checked for straightness and twist
narrowed small ends (1.00")
narrowed big ends
pin ends bushed down to .925 (.002 press for .927 pins)
steel bushings, .005" interference + tack weld
rod side clearances .010"
resized big ends (minimum size)
chamfered sides of big ends
Michigan 77 rod bearings, 340 Mopar
bearings narrowed to .770-.775" wide (stock .830")
rods use .001" and .002" shells for .002" rod oil clearance
.001" shells on top, .002" shells on bottom
some tangs filed to position bearings properly
note: Mopar tang notches are randomly positioned
block:
351W D4AE-6015-AA8 block casting, has bosses for four bolt mains
bored .060
honed to .005 piston/wall clearance, spec for TRW forging
honed to #600 finish (ultra smooth)
2 piece rear main seal (blue silicone around edges)
new core plugs (blue silicone sealer)
painted (Rust-Oleum black)
new cam bearings (King)
align honed mains
heads:
Edelbrock Performer 351W
5/16" guide plates
7/16" screw-in studs and polylocks
all ports passed vacuum check
heads take either taper or gasketed 14mm spark plugs, 5/8" reach
1/2" ARP head studs
cam:
Isky 280 Mega hydraulic
advertised figures (checked at .007" after opening to .010" before
closing)
intake exhaust
duration 280 280
open 32 BTDC 68 BBDC
close 68 ABDC 32 ATDC
lobe lift .323 .323
valve lift .517 .517 (at 1.6:1)
lash n/a n/a
lobe center 108
overlap 64
.050" figures
232 232
open 8 BTDC 44 BBDC
close 44 ABDC 8 ATDC
Isky cam lube used for assembly lube
firing order: 351W firing order
pushrods:
Ford Motorsport standard 351W (length checked) (customer provided)
rockers:
Crane 1.6" gold aluminum roller rockers, 7/16" (customer provided)
valves set to .030" preload with dial indicator during assembly
timing set:
Cloyes dual roller (customer provided)
cam chain index +4 (degreed in 4 degrees advanced)
289-type one piece fuel pump eccentric
oil slinger on snout of crank
oiling:
Melling high volume oil pump
Milodon pickup
Milodon oil pan
Motorsport billet driveshaft - made aluminum collar to retain
MPG windage tray, ~1/8" clearance to rotating assembly
harmonic balancer:
stock 351W, rebuilt by Damper Dudes (customer provided)
checked TDC, cut long TDC mark and short 10 before mark
flywheel:
Hays billet steel, balanced to 28oz
14 1/2" x 1/2" lightening holes required for rebalance
Ford Motorsport threadlocker-coated bolts
intake:
Edelbrock Performer RPM (customer provided)
===========================================================================
assembly lubricants:
rod bearings: 30wt ND
rings: Unilube two stroke oil
cylinder walls: Mobil 1 5w30
piston skirts: Mobil 1 5w30
wrist pins: Mobil 1 5w30
head bolts - threads: ARP moly grease
main bolts - threads: 30wt ND
head, main bolts - under head: ARP moly grease
rod bolts: ARP moly grease
cam bolt: Fel-Pro Grey Bolt Prep
cam retainer plate bolts: Loctite 252 blue
cam lobes: Crane cam lube
cam journals: Isky cam lube
cam distributor drive gear: Isky cam lube
cam retainer plate/sprocket: moly grease
crankshaft rear oil seal: Mobil 1 5w30
===========================================================================
Stewart-Warner Model 2000 Industrial Balancer
balance:
(reciprocating)
621 piston
143 pin
226 pin end of rod
59 rings
(rotating)
497 rod big end
497 rod big end
49 rod bearing (.770-.775 wide)
49 rod bearing (.770-.775 wide)
---
2141 grams bob weight
critical speed 750 RPM
resonant speed 625 RPM
max front imbalance .015 oz/in
max rear imbalance .02 oz/in
(balance is 1/10 of standard spec; close to the machine's resolution limit)
balance was drill-only
balanced for 28oz damper and flywheel
===========================================================================
RUN-IN: -----------------------------------------------------------------
Make sure you don't have any loose wires or hoses in the way of the fan
before firing the engine. It is a great temptation to just start it up
with nonessentials hanging hither and yon.
Pour in 5 quarts of your favorite brand of non-synthetic oil, 10-30 or 10-40
weight, one bottle of General Motors Engine Oil Supplement, and screw
on an oil filter. It probably wouldn't hurt to fill the filter before
putting it on.
With the "+"coil wire disconnected and spark plugs out, crank the engine over
until oil comes out the pushrods, or use an engine priming tool and a drill.
Attach the coil wire and valve covers, put the plugs in, attach plug wires.
Fill the radiator with straight water.
Start the motor and run it up to 2000 RPM for 20 minutes to break in the cam.
DO NOT IDLE. If you don't have a tach handy, run it up to a fast idle, then
guess at twice as fast. Wedge a piece of cardboard or folded paper between
the idle stop screw and throttle linkage.
Use the timing light to set the timing to 8 degrees at idle; it's okay to let
the engine to drop to idle for a few moments to do this.
Smoke and noise will come from the motor as paint burns off, etc. Ignore
anything that doesn't sound terminal. Water temp will probably go right on
up there; it's okay as long as it doesn't go over 230 or boil over. If you
have near neighbors remember this will make a fair amount of noise.
Shut down. Change oil, filter, drain radiator and fill with 50/50 antifreeze
or other coolant. Take care of any leaks or problems. Let engine cool.
Break in by driving around for about a hundred miles. Try not to idle in
traffic. Change oil and filter again. Check for leaks. The engine is
ready to drive. At 3K miles you can change to synthetic oil if you wish.
Oil Viscosity:
Use the lowest viscosity oil required to maintain hot idle oil pressure of
at least 25 psi. This will circulate the maximum amount of oil through the
bearings. Very thick oil just goes right through the popoff valve built
into the oil pump and you can be starving the bearings while the guage
happily reads 60-80 PSI.
TORQUE SPECIFICATIONS -----------------------------------------------------
--------torque---------------spec-----------thread---lube------------------
rod bolts
stretch to .0065 (ARP spec .0062-.0067) 3/8-24 ARP moly lube
main cap bolts
torqued to 100 ft-lb (Ford spec 95-105) 1/2-13 oil
note: 1) use moly grease under bolt head
2) step 1: 50 ft-lb
step 2: 80 ft-lb (reverse pattern)
step 3: 100 ft-lb (reverse pattern)
head bolts
torqued to 70 ft-lb (ARP spec 65-72) 1/2-20 ARP moly lube
note: 1) with hardened washers, ARP moly lube both sides of washer
2) block is blind tapped, no sealer needed
3) step 1: 50 ft-lb
step 2: 70 ft-lb (reverse pattern)
step 2: 85 ft-lb (reverse pattern)
damper (harmonic balancer) bolt
(Ford spec 70-90) 5/8-18 oil
note: use automatic transmission fluid as lubricant when pressing damper on
intake manifold bolts
(Ford spec 23-25) 5/16-18 sealer
note: 1) see drawing for pattern
exhaust manifold bolts
(Ford spec 18-24) 5/16-18 antiseize
note: 1) see drawing for pattern
rocker studs (torque 40 ft-lb) 7/16-16 sealer
note: use high temp antiseize if available
timing chain sprocket bolt
torqued to 40 ft-lb (Ford spec 40-45) 3/8-16 (Fel-Pro Grey Bolt Prep)
cam retainer plate
torqued to 10 ft-lb (Ford spec 9-12) 1/4-20 (Fel-Pro Grey Bolt Prep)
oil pan bolts
(Ford spec 7-9) 1/4-20 dry
(Ford spec 9-11) 5/16-18 dry
oil drain plug
(Ford spec 15-25) 1/2-20 oil
water pump bolts
(torque 12-18) 5/16-18 antiseize
timing cover bolts
(torque 12-18) 5/16-18 antisieze
1/4 NPT threaded oilway plugs 1/4, 3/8 NPT Teflon tape
oil pump pickup
(Ford spec 9-11) 5/16-18 Loctite 242
oil pump cover plate
(Ford spec 9-11) 1/4-20 Loctite 242
oil pump body
(torque 30-35) 3/8-16 Loctite 242
spark plugs
18mm antiseize
bottom pulley to damper
(Ford spec 35-50) oil
valve cover
(Ford spec 3-5) 1/4-20 oil
fuel pump to timing cover
(Ford spec 19-27) 3/8-16 antiseize
fan to water pump
(Ford spec 12-18) 5/16-24 antiseize
carburetor to intake
(Ford spec 12-15) 5/16-18 antiseize
SPECIAL PARTS ------------------------------------------------------------
specially made parts: 1018 steel rod bushings
aluminum collar for oil pump drive rod
modified parts: rods narrowed both ends
rod bearings narrowed
pistons flycut
harmonic balancer remarked to true TDC
neutral flywheel balanced to 28oz