Author: Dave Williams; dlwilliams=aristotle=net
This is the engine in my '71 Capri during its rebuild in 1995. My wife still drives the car to work. I used it as a testbed to try out Tech Line's do-it- yourself coatings. I found there were many ways to screw up an apparently simple job, but when correctly applied (as in "follow the directions without getting inventive") they worked as advertised.
After owning the car since 1984, I sold it in October 2002 to Norm Murdock at Team Blitz, along with all my Capri bits I'd collected over the years. Norm's pretty happy with it; he's using it as a "club car" for people to drive at the Capri Swarm events.
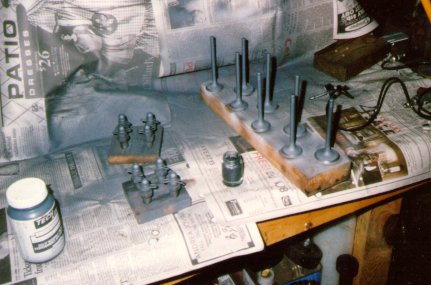 Moly coating some of the valvegear. I used Tech Line DFL-1 for this. The
valves have already been ceramic coated with CBC-3; the overspray of DFL-1
won't hurt a thing. Each piece has to be abrasive blasted so the coating will
get a good bite; this means sandblasting, which has a fair pucker factor when
you're turning a mirror-bright part rough.
Moly coating some of the valvegear. I used Tech Line DFL-1 for this. The
valves have already been ceramic coated with CBC-3; the overspray of DFL-1
won't hurt a thing. Each piece has to be abrasive blasted so the coating will
get a good bite; this means sandblasting, which has a fair pucker factor when
you're turning a mirror-bright part rough.
 Baking valves in the toaster oven. One of these days I'll get one with a
thermostat! Bake temp is 350F for one hour; then the parts have to be buffed
smooth.
Baking valves in the toaster oven. One of these days I'll get one with a
thermostat! Bake temp is 350F for one hour; then the parts have to be buffed
smooth.
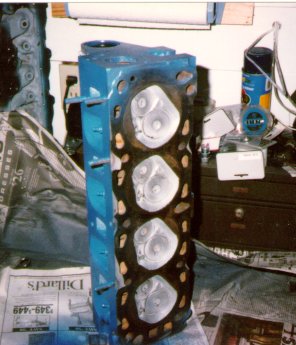 Assembled cylinder head, ceramic coated chambers, valves, etc. You can't see
it from this angle, but the exhaust ports are also ceramic coated. You see
how the coating looks dull? That's because the casting is rough and you can't
polish the entire coated area properly; the coating in the pits can't be
reached with the steel wool. You should polish the chambers with abrasive
stones before you sandblast and spray. *Now* I know that...
Assembled cylinder head, ceramic coated chambers, valves, etc. You can't see
it from this angle, but the exhaust ports are also ceramic coated. You see
how the coating looks dull? That's because the casting is rough and you can't
polish the entire coated area properly; the coating in the pits can't be
reached with the steel wool. You should polish the chambers with abrasive
stones before you sandblast and spray. *Now* I know that...
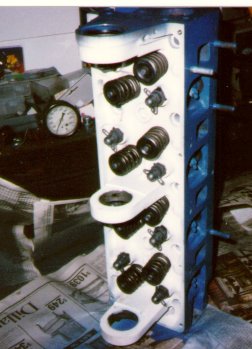 Here's the other side. I coated the cam bearings, but they're not in yet.
This is just a stock head. The head on the original motor was ported
according to David Vizard's book, had been milled .080, and had a Sig Erson
280AS cam in it. This head is still on there. I've pulled the valve cover to
check valve adjustment and to peek at the coatings; everything seems to be
holding up fine.
Here's the other side. I coated the cam bearings, but they're not in yet.
This is just a stock head. The head on the original motor was ported
according to David Vizard's book, had been milled .080, and had a Sig Erson
280AS cam in it. This head is still on there. I've pulled the valve cover to
check valve adjustment and to peek at the coatings; everything seems to be
holding up fine.
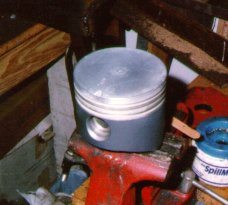 New .020 piston, ceramic coated top, moly coated sides. I had a little
trouble with the ceramic trying to bubble; mostly a case of not following
the directions properly.
New .020 piston, ceramic coated top, moly coated sides. I had a little
trouble with the ceramic trying to bubble; mostly a case of not following
the directions properly.
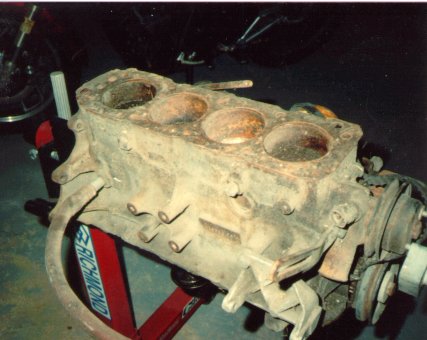 A spare Capri motor from my "stuff" pile. If you'd driven a bazillion miles
and then laid out in the weather for a few years, you wouldn't look so great
either. The usual cleaning, boring, honing, rethreading holes, etc. all had
to be done.
A spare Capri motor from my "stuff" pile. If you'd driven a bazillion miles
and then laid out in the weather for a few years, you wouldn't look so great
either. The usual cleaning, boring, honing, rethreading holes, etc. all had
to be done.
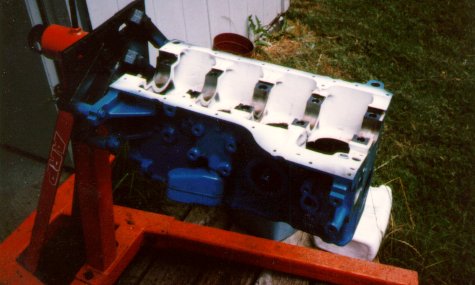 .020 over engine block, bored, honed, epoxy painted. It's getting its final
scrub with laundry detergent and the garden hose.
.020 over engine block, bored, honed, epoxy painted. It's getting its final
scrub with laundry detergent and the garden hose.
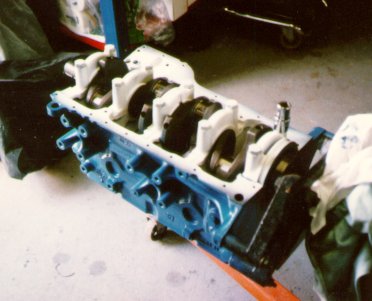
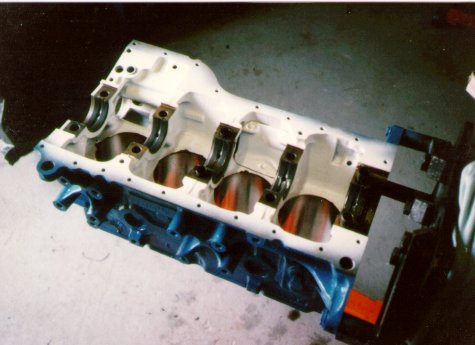 Coated bearings in place, ready to drop the crank in. The white internals and
black bearings give an odd reverse-video effect. I haven't done any more with
epoxy in the crankcase area, it's just too much hassle to clean and mask
everything.
Coated bearings in place, ready to drop the crank in. The white internals and
black bearings give an odd reverse-video effect. I haven't done any more with
epoxy in the crankcase area, it's just too much hassle to clean and mask
everything.
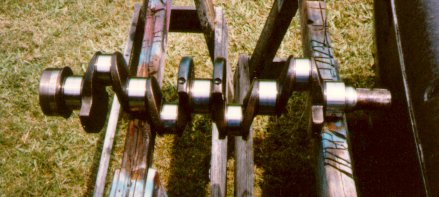 Cleaning the crank with Gunk and the hose. I ran rifle cleaning brushes
through the oilways, retapped the flywheel bolt threads, and so forth. The
journals were barely worn - well within factory specification, so I polished
them with fine abrasive tape.
Cleaning the crank with Gunk and the hose. I ran rifle cleaning brushes
through the oilways, retapped the flywheel bolt threads, and so forth. The
journals were barely worn - well within factory specification, so I polished
them with fine abrasive tape.
 Now the crank is installed. I didn't coat the crank, though Tech Line
recommended sandblasting the whole thing, coating the journals with their moly
coat, and using their oil-shedding coating on the counterweights. The white
epoxy on the bolt heads held up to the sockets okay, but if I do it again I
won't paint them.
Now the crank is installed. I didn't coat the crank, though Tech Line
recommended sandblasting the whole thing, coating the journals with their moly
coat, and using their oil-shedding coating on the counterweights. The white
epoxy on the bolt heads held up to the sockets okay, but if I do it again I
won't paint them.
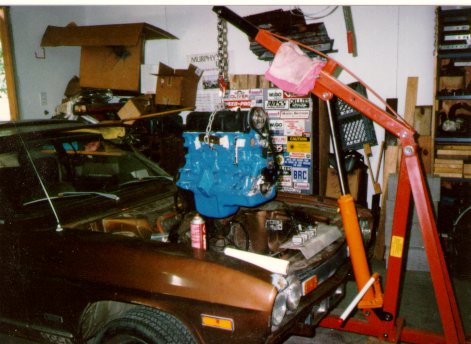 All done; dropping the fresh 2000 back into the '71. It fired up the first
try. The engine was pretty tired when it came out, so it's hard to tell what
effect the ceramics had on power, but I did note some interesting effects.
You can twist the distributor around until the engine stalls, but you can't
make it ping. And the heater doesn't work worth squat any more; the temp
guage says cold during the winter. I have to block off most of the radiator
with cardboard and tape off the flow-through vents in the cowl to get a little
warmth for the defroster; prior to that, the Capri's heater could roast a
chicken.
All done; dropping the fresh 2000 back into the '71. It fired up the first
try. The engine was pretty tired when it came out, so it's hard to tell what
effect the ceramics had on power, but I did note some interesting effects.
You can twist the distributor around until the engine stalls, but you can't
make it ping. And the heater doesn't work worth squat any more; the temp
guage says cold during the winter. I have to block off most of the radiator
with cardboard and tape off the flow-through vents in the cowl to get a little
warmth for the defroster; prior to that, the Capri's heater could roast a
chicken.